Tuesday 23 June 2015

How to remove paint from sandstone

This post really should be titled "How on earth do you remove paint from sandstone?" - followed closely by "why would anyone paint sandstone - particularly dark green?!"

The latest project for The Crooked Cottage is trying to do something about the horrible front fence.  You always hear about "curb appeal" when you see any kind of home renovation show, and our place is seriously lacking in appeal.  

First we have a retaining wall.  In the past year I have noticed some deterioration, and I have to admit I have helped it on its way by pulling off bits of paint that have flaked off. During some of the heavy rain some small stones have dislodged and I have realised some of the green colour is actually moss.

Underneath that green paint I was pretty sure it is sandstone, although the left hand side does also seem to have some layers of brick on top.  But then at some stage (and I imagine it was some time ago, as all the neighbours talk about the green wall like it has been a long standing eyesore) it has had cement render type substance sprayed on, and been painted green. Maybe to blend in/hide the moss?!

The dastardly green retaining wall.  Complete with cracked render, flaking paint and random weeds.  

And above the retaining wall we have the paling fence.  Like every other painted surface in this place, it's quite clear that paint just keeps getting put on over the top.  Blue is the most recent (apparently done for sale - which probably explains why I don't recall so many rotten spots or obvious cracking on the palings) over green, over white.  But apart from an occasional paint coating this fence hasn't been cared for, and it is now rotting on many palings.  

Rotting palings with cracked paint
So I decided that I would change the fence palings.  I pulled one off (very easy as they keep falling off due to being rotten) and took it up to Fedwood - I figured I could just buy some new palings, nail them on, paint them white, and hey presto - new fence.

But the posts are also rotten.  And palings are more expensive than I realised (particularly custom made ones to match my rotten ones).  So then I thought - ok I should get the fence replaced.  And that started me thinking about the retaining wall, as it seems stupid to redo the fence, only to late do something about the retaining wall.

As my neighbour is always a) out working on his house and b) probably very keen to get rid of the eyesore too we had a bit of a discussion over what I could use to get rid of the paint.  First up I borrowed a pressure sprayer - we thought it would be fairly easy, but unfortunately we were wrong.

Next step - and by this time another neighbour had joined our conversation - so he brought over some acetone to try out.  We didn't want to use paint stripper, as we didn't want to eat into the sandstone.

Acetone didn't work either.

So then we tried a heat gun - which sort of worked.  In a slow way.  Heat gun, peel paint, and repeat.  Followed by another go at the pressure spray, which worked a bit better on the brittle paint.

Initially I put in about 2-3 hours of effort last week.  

Initially I just worked on the steps.  Hard to believe this is a good two hours work!
Then my husband and I spent the better part of Saturday on the same jobs.  Add a few burns for me (it's easier to peel the paint without gloves on - I know that is not as safe - and I have the burns to prove it!) but a bit more result.  Then we also started on the retaining wall - using a hammer and chisel to remove some of the render areas.  This was more successful - but still slow.

After another days worth of work


Chipping off the render haas assisted - some of this green is now moss not only the paint!
Sunday - I bought sandpaper, 40 grit so it is super coarse.  With no luck!

So I have to just face the fact this is going to be a long, slow process.  Unless I decide to get a sandblaster out - although I am not sure how expensive that would be, and also I don't think that would be very safe for the cars in our very narrow street.

After more work on Sunday - please excuse the weeds!  They will be destroyed by the heat gun when I get to that part

And a little bit more removed after a few more hours.


Any suggestions will be happily taken and tested out!  I'll just be outside my house peeling paint.  At least it is good for meeting the neighbours - I've never had so many stop and tell me what a good job I am doing, and how it is worthwhile, and it will look so good once it is done.  Fingers crossed!

Saturday 13 June 2015

A productive Saturday

I do love the feeling of being productive on the weekend.  Although it is nice to have those lazy days where you do nothing much, I've decided that I prefer the weekends where I manage to garden (or DIY - or maybe both!), catch up with friends AND have a bit of a relax.

It's only Saturday night, and I already feel pleased with my achievements.  So naturally, self congratulation is only so good - I feel the need to share with everyone!

Friday night was quiet but I did watch Better Homes and Gardens, and then my new favourite show - Selling Houses Australia.  I admit I do occasionally end up feeling a bit smug that we did buy one of those houses without the "Shayna Blaze dressing"-  and paid less because of it.  I always wonder if the people who did buy the houses see it on TV and curse that they could have bought it cheaper. 

Then this morning my productiveness (is that a word?  Probably not) began.  A trip to the Orange Grove Markets was first order.  I have blogged about the markets before (read it here) - I'm not so interested in the organic produce (after all I am trying to grown my own!) but the plants and flowers are good.  So today's purchases were cauliflower and broad bean seedlings, and a kaffir lime tree. 


The broad beans and cauliflower seedlings prior to planting.
I came home, and spray painted another pot (there were quite a lot of large pots left here, but all were ugly and scratched, so I am gradually trying to pretty them up).  I weeded, and I sifted an awful lot of dirt (I've been sifting dirt for months, as the previous owners seemed to have had a pebble landscape at some point - which means there are rocks in every garden bed.  I use a colander that I bought for $2 at the local Vinnies, which we then drilled larger holes into.  And I decided to remove my basil plants, which had become very woody and were totally gone to seed.  I am going to try to dry the plants and keep the seeds though.  

My excellent dirt and pebble sieve.

The flowers of the basil plant, which I hope I can dry out and keep the seeds from.
Once the garden bed was prepared I planted out my cauliflower and broad bean seedlings.  I also planted beetroot seedlings I bought last week, and finally planted the hyacinth bulbs which have been sitting in my fridge for a good month or so waiting to be planted.  

Caulis and beans planted out in my freshly sieved garden

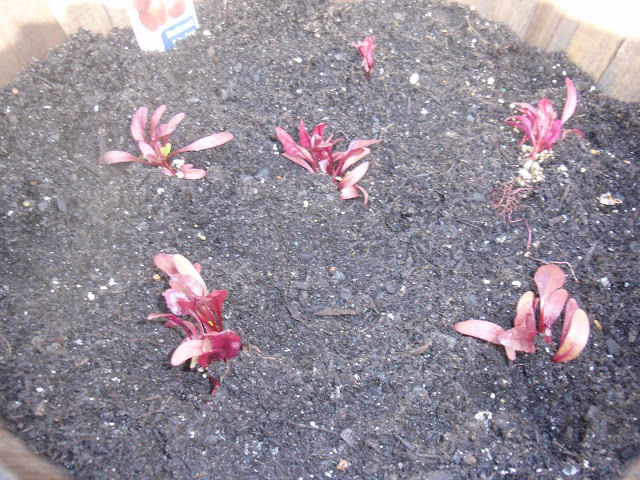
Beetroot seedlings planted out


Hyacinth bulb is already shooting a little


Once the pot was dry I planted the kaffir lime tree out as well. 

I took a few more photos of my garden - just because some of the flowers are looking lovely, even if it is June and the middle of winter here!

One of my snap dragons 

Quite an extreme close up of one of the snap dragons

Lemon tree blossoms - hopefully that will mean I will have some fruit.
Plus I took a trip to Fedwood timber to try to find out about replacing the palings on our fence.  It seems it will be a lot more expensive than I expect, so I'm still considering.  I discussed it with my neighbour, and we have decided that to start with we will try to remove the disgusting green paint on the retaining wall  - so tomorrow morning I will be borrowing my neighbours gurney and taking on a green painted sandstone wall.  (yes that's right.  They painted sandstone green.  Why??)  

So that was just the morning!  I had lunch with a friend and a wander through Rozelle.

And then this evening I was lucky enough to go to see the screening of the film "Women He's Undressed" as part of the Sydney Film Festival at the Hayden Orpheum in Cremorne.  I went with another friend who was able to get tickets through her work.  It's a documentary, directed by Gillian Armstrong, who was at the screening.  The film was great, and I've never been to the Orpheum before - it's beautiful.  Definitely recommend checking it out! 

The organ being played before the performance

The ceiling in the theatre (The camera phone doesn't really do it justice!)

Wednesday 10 June 2015

The great bathroom window debacle - also known as council compliance

So this post is really a warning to all those DIY renovators like myself who may not realise the areas you can get into trouble with from your local council.


When we were renovating the bathroom/laundry, we had already removed the asbestos and so needed to get the walls resheeted.  The ceiling is sloping, and also had exposed beams.  Our plasterer/handyman suggested we put in a new ceiling to remove the beams.  All of which was fine.  The problem was the windows that had previously been in place.  When we went to prepare to resheet - it was discovered that what had previously been in place was two sheets of glass fixed to the outside of the house, and a frame on the inside to make it appear like a proper window - but these were never attached together!

So once we realised this we had a dilemma.  We couldn't reuse these windows, it was just not possible.  But the two windows which were there were unusual sizes, and to find windows to fit this seemed difficult.

So my plasterer came up with a  (seemingly) great idea - he could get a frosted glass window, "only a little bit bigger" and he would put one larger window in the place of the two smaller ones.  I naively said ok, go ahead.

So the window was installed.  As soon as I saw it (completed, as I had had to go to work while this was all going on) I knew it was a fair bit larger than the previous windows.  And was lower down.  But I still didn't think too much of it.


The offending window once bathroom was complete

So this is the new window - window is great but still need to finish the tiling!

Until I came home to the business card from the council compliance office stuck in my door.  And discovered my neighbour had made a complaint about our new window.  She did come to see us afterwards, but unfortunately the damage was done when she had already spoken to the council.  So even though we came to a mutually satisfactory agreement (we would replace the window with a fixed frosted window of the same size, in place of the sliding one we had put in) the council didn't care - we had to replace what had been there (impossible) or lodge a building application for what we had put in (what's the point - she would not allow it?!)  They were quite inflexible which is frustrating.  In the end, we had to get custom made windows of the same size that had previously been there.  Although they had previously been clear glass, as I pointed out to the council guy - frosted is much more practical in a bathroom.  So we were allowed to have frosted glass.  (technically it should have been exactly the same, so clear - which to me just shows how silly some things are, however at least the council officer did give us some leeway on this).

In the end, we had the windows custom made by Select Windows, and although rather pricey (it came in altogether at approximately $3000 but this included replacing our other side window, which had been glass bricks but we had knocked out and had been using a nailed on board!) we are really happy with the end result.  The neighbours are also happy - and given the large bunch of flowers we found on our doorstep not long after the whole debacle I think they appreciated us not kicking up a fuss - and possibly also felt sorry for not speaking to us first, as we could have worked it out between us at less cost!

But the take home lesson is - look up on your council website the restrictions in your area.  And windows are probably always something that you need to be careful with - I really hadn't thought of it but no one wants the neighbour to be suddenly able to see into areas they had never seen before!  Making an error like this can be costly, so even though a fast decision might seem like a good idea - look into it first.  We were lucky that as we had made an honest mistake, and moved quickly to fix it, the council did waive what apparently could have been a sizeable fine on top of the costs to replace the windows.  So maybe Leichhardt Council isn't all bad.  Maybe.

Friday 5 June 2015

You always need a bright spark(y)

One of the first things I wanted to do when we started renovating was get an electrician in. To be honest, it had to be done fairly early as the previous owners didn't seem all that keen on light fittings, or working bulbs, and so there were a lot of strange empty sockets around.

Also given the age of the building I was nervous that some kind of dodgy wiring would lead to the whole cottage burning down.


And finally, as I have mentioned in an earlier post (you can read it here) - the previous owners were rather keen on painting over light switches.  And power points.  So I wanted to replace the red and green and brown switches to more usual white ones!


So I found a few electricians, and I have to say they all said similar things, which was basically if you start looking into wiring it may open up a can of worms, that it would be best to live in the house for a while before deciding where we needed to put power points etc, and that we may want to do more decorating first before putting in the new light fittings.


But I had already decided I wanted all this done so I insisted.  Which, although I think it was good advice which I was given, I don't regret getting our electrician in early.


The good news was that we had safety switches, and that some work had been done recently, so that we didn't need to worry too much about the rewiring.


There wasn't really any bad news (thank goodness).  Mike (our electrician) was great, and very flexible.  So while he changed all our powerpoints to double ones, changed all the light switches, moved our power points in our main bedroom off the skirting boards (why they were there I don't know.  But it meant you couldn't really plug anything in to them!) and rearranged the cabling in the bathroom, which had previously all been on the outside of the wall (again, who knows why), I went shopping for new light fittings.


This is to try to show the wiring in the bathroom/laundry.  Obviously this is after the asbestos was removed by the wiring had only been sitting on the outside of the wall anyway!


Bit hard to see but this is the famous brown and green light switch.


Most of our lights we bought from Bright Lighting in Punchbowl.  I have to say, and this is not sponsored or anything, but they had the most excellent customer service. I was really happy to go there and their prices were very reasonable.


Some of the before shots of light fittings in the kitchen and spare room.

We installed a chandelier for the lounge room, a pendant light for the spare room, two wall lights for the main bedroom, and matching lights for the kitchen and dining room.  The only thing I regret is that the kitchen lights are not bright enough, however I think this could be improved by changing the bulbs to higher wattage - another thing to get around to.


The other item I purchased was an exhaust fan for the bathroom.  Because our roof in the bathroom is a flat tin roof there is very little space between the ceiling and roof.  For this reason we had to use a wall exhaust fan.  This vastly limited our choices. I discovered most are to be ceiling mounted.  The strength of an exhaust fan is shown by the airflow (cubic metres per hour) and you do need to take into account the size of your room.  Since our bathroom is large, plus we have it combined with our laundry, which may add more moisture, I wanted the strongest fan I could get.


Once I purchased all the lights and the fan Mike installed them for us.  Plus sensor lights for the front of the house, and an external light and external switch on the deck.  And his final work was wiring our hot water system, which the plumber moved from inside the bathroom to outside the house, and for which we needed somewhere to plug it in!

In total we spent approximately $2000 on the electrician.  The lights were approximately $500 for all in total (that is extra to the cost for the electrician), but I did find that you can easily spend much more, as lights vary enormously.


It's definitely worth while getting an electrician to check everything out.  And I think it is a relatively small investment that can really make a major difference to the look of the house.

Monday 1 June 2015

Garden Share - June 2015

My how time flies!  Can it really be time for another garden share?  The month has flown.  As before, I am joining in the Garden Share Collective which is hosted by Lizze from Strayed from the Table, Kate from Rosehips & Rhubarb and Krystie from A Fresh Legacy.  You can also find it Facebook if you want to share your adventures in growing your own food.

But this month I feel like I can actually claim to have done some good work.  Mostly on one particularly busy and productive day, but however I did it I have managed to get started with some new vegies!  Mind you it appears that after all my hard work on that day I apparently couldn't hold the camera steady - I do apologise for the blurry photographs!

I finally put in my garlic.  Whether I am a bit late we will find out I suppose, but they are actually already shooting up (although I noticed this when I got home today after a few days away and it was too dark to photograph).  I counted 27 cloves off just two bulbs that I have planted. (I initially had three bulbs, but didn't need any more to plant, so we cooked that last one!)


I bought the garlic from an organic fruit market - and to be honest I don't know what kind it is.  I read that you can plant any garlic, however you shouldn't buy them in the supermarket because they have been treated with chemicals to stop the cloves shooting.  Also they come from goodness knows where in the world.  So organic it is.  Once I peeled off the outside layer I realised these ones were already shooting.


I just broke apart the bulbs into individual cloves and dropped them into little trenches which I made in my specially made garlic patch - in the prized and much too small section of my garden which does get almost full sun.  Covered up with some good organic vegetable mix and fingers crossed for a great haul!

When I was turning the soil for my garlic I was quite pleased to find a number of worms - hoping that means my garden is nice and healthy.  After I found this one though I stopped using my trowel and used my hands instead - I didn't want to kill all these lovely earth turning creatures!


Also planted this month - 

Pak Choi - last year I had a lot of success growing these and we used a lot in stir fries, so this year I'm trying again.
  
Silverbeet - my spinach growing has not been great, but I'm hoping these might be more successful.


Snow peas - possibly not the right time, but I have saved another small part of my sunny side garden bed and hopefully the snow peas will climb up my chicken wire lattice.


Cabbage - along with some land cress to try to prevent caterpillars.


Landcress has also gone in around my broccolettes, as they continue to be attacked by caterpillars, despite my best squashing efforts.  These are some of the critters I did find.


Spring onions - always a good addition for stir fries.

Mignonette lettuce are also always useful, and I find not too difficult to grow, always good to have on hand.

So apart from my new additions, I continue to have chillis, coriander, basil, oregano, and those late tomatoes are still green but getting bigger!  I've harvested some more broccolettes and some rocket and lettuce, otherwise a bit of a lean month.


So for the next month I think it will be mostly looking after my new seedlings, and starting to plan for spring which I am sure will arrive before I know it!  Happy gardening to all.